REST API
Overview
Behind the scenes, the Cloud Office Print SDKs are creating a JSON file that will be sent to the Cloud Office Print server. Below you can find more details about the JSON structure that is used. By understanding this JSON structure, you can manually interact with the Cloud Office Print server.
JSON File
The JSON file is a file that follows the standard JSON structure: json.org.
The JSON file contains a JSON object meaning it starts with { and ends with }. This JSON object contains four compulsory JSON objects namely "template", "output", "files", "api_key" and a few optional objects "version", "logging", "cop_remote_debug" and "ipp". The purpose of each object will now be explained.
"version" object
This object contains the version of the Cloud Office Print JSON format used. The versions are backwards compatible and this object is thus optional. This should be used if a newer version is released that is not backwards compatible.
"template" object
This object has the necessary information about the template. It contains:
| JSON | Explanation |
|---|---|
| "file" | This contains the template to be used, encoded in base64. |
| "filename" | This option is for on-premise users. The template defined by this object will be used for processing. Note that the filename either contains a relative path from where the server is running from (or the folder/directory containing application) or an absolute path. |
| "url" | This option allows you to give a URL containing the template. The URL will also work with google drive (also with google docs/slides/powerpoint) and dropbox file sharing link. However this might not work in the future since the way links work might be changed by google or dropbox. Note this URL can also use the ftp protocol. |
| "template_type" | This states what kind of template is being used. It must be either "docx", "pptx", "xlsx", "html" or "md". |
| "html_template_content" | It is possible to just pass html as template. This is equivalent to using the {_html} tag in Word to create the template which is then again passed to Cloud Office Print with the data for rendering. |
| "orientation" | Nothing or "landscape". If landscape is provided then the html template content will be rendered in a landscape A4 word template. Taken only into account when html_template_content is provided. |
| "start_delimiter" | The starting delimiter used inside of the template. The default starting delimiter used is {. Avaliable starting delimiters at the moment are: {, {{, <<, <. The delimiter specified in the JSON must be used as the delimiters inside of the template. Template Reference |
| "end_delimiter" | The ending delimiter used inside of the template. The default ending delimiter used is }. Avaliable starting delimiters at the moment are: }, }}, >>, >. The delimiter specified in the JSON must be used as the delimiters inside of the template. Template Reference |
| "should_hash" | The template defined by ("should_hash":"true"). This object will be used for md5-hashing. Note that the object creates a new hash for file data given in the JSON file which is stored in cache. Currently only Word, Excel, Markdown, Text, HTML, CSV and PowerPoint hash-template generation is supported. |
| "template_hash" | The template defined by ("template_hash":"{hash}"). This object will be used for validating the hash presence in cache. Note that the object gives error message i.e. ("Received UNMATCHED HASH. Please validate the HASH.") if the hash is not validated, else it gives the template for the hash. Currently only Word, Excel, Text, HTML, Markdown, CSV and PowerPoint hash-template generation is supported. |
If "file", "filename" or "url" objects are not present in the "template" object then the server will respond with a custom template file of "template_type" made from this given JSON file. Currently only Word, Excel and PowerPoint template generation is supported.
The sharing link made by Dropbox and Google Drive will be modified so that the online editor will not be triggered, and are subject to change by Google Drive and Dropbox. For this reason using share link for production is discouraged. The change happens in the following way:
- Google Docs Share URL:
https://docs.google.com/document/d/{ID}/edit?usp=sharing- will be changed to:
https://docs.google.com/document/d/{ID}/export?format=docx&id={ID}
- will be changed to:
- Google Sheets Share URL:
https://docs.google.com/spreadsheets/d/{ID}/edit?usp=sharing- will be changed to:
https://docs.google.com/spreadsheets/d/{ID}/export?format=xlsx&id={ID}
- will be changed to:
- Google Slides Share URL:
https://docs.google.com/presentation/d/{ID}/edit?usp=sharing- will be changed to:
https://docs.google.com/presentation/d/{ID}/export/pptx?id={ID}&pageid=p
- will be changed to:
- Dropbox Share URL:
https://www.dropbox.com/s/{ID}/{filename}?dl=0- will be changed to:
https://www.dropbox.com/s/{ID}/{filename}?dl=1
- will be changed to:
- Google Drive Share URL:
https://drive.google.com/file/d/{ID}/view?usp=sharing- will be changed to:
https://drive.google.com/uc?export=download&id={ID}
- will be changed to:

"output" object
This object contains the information regarding the output file of the given JSON file. It contains:
| JSON | Explanation |
|---|---|
| "output_type" | This states what kind of output file type is required. It can be either the same as template_type ("docx", "pptx", "xlsx", "html", "md"), "pdf" or any other output file supported by LibreOffice/OpenOffice. Special output type: "onepagepdf", this will cause the ouptut to be converted to pdf and all the pages will be merged into one single page. The default output_type is the template_type. You can also specify the following special output_type: 1. "form_fields" which will return back the forms that were found on the pdf that was provided as template. 2. "count_tags" will return the different tags in the template and their count. 3. "meta_data" will return the meta data of the file like creator, last modified by, mime type etc. This is only available for docx, xlsx and pptx. |
| "output_encoding" | This defines the output encoding of the output file. It must be either "raw" or "base64". |
| "output_converter" | This states which software should be used to convert to PDF. The Cloud Office Print API uses LibreOffice by default. On premise users may use MS Office but will need to do some configuration first. Available values: "officetopdf" (Windows only) or "libreoffice" (Windows, Linux, OSX) "libreoffice-standalone" or any other custom defined converters in the cop_config.json file (see "setting up Cloud Office Print"), if you are using the On Premise Version. |
| "output_location" | Used to save a file to a cloud-based service. Possible options are: "dropbox", "gdrive" (Google Drive), "onedrive", "aws_s3", "ftp", "sftp". |
| "output_directory" | If save on disk is enabled, then the document will be saved on the path resulted by combining this given path with the specified directory. |
| "cloud_access_token" | When saving a file to a cloud-based service, the service requires a way of authenticating with your account. More information can be found here. |
| "output_even_page" | If you want your output to have even pages, for example printing on both sides after merging, you can set this to be true. This option is only available when the output is PDF. Optional. |
| "output_merge_making_even" | Merge each given document making sure they have even pages. This option is only available when the output is PDF. Optional. |
| "output_remove_last_page" | Remove last page from the given document. This is option is only available when the output is pdf. |
| "output_modify_password" | The password needed to modify the output file. Optional. If this is omitted and a read password is provided, read password will be used as modify password. This option is only available when the output is PDF. Optional. |
| "output_read_password" | The password needed to open the PDF. This option is only available when the output is PDF. Optional. |
| "output_password_protection_flag" | Bit field explained in the PDF specs in table 3.20 in previous section, should be given in decimal more info. This option is only available when the output is PDF. Optional. Default (4). |
| "output_watermark" | Requires output pdf, generates a diagonal custom watermark on every page in the PDF file. Optional. |
| "output_watermark_color" | Requires output pdf, secifies color of watermark specified in "output_watermark", default color valueis black. Optional. |
| "output_watermark_font" | Requires output pdf, secifies font of watermark specified in "output_watermark", default is Arial. Optional. |
| "output_watermark_opacity" | Requires output pdf, secifies opacity of watermark specified in "output_watermark", should be in percentage. Optional. |
| "output_watermark_size" | Requires output pdf, secifies size of watermark text specified in "output_watermark", should be a number(px) ie: 45 . Optional. |
| "lock_form" | Locks/flattens the forms in the pdf. This option is only available when the output is PDF. Optional. |
| "output_copies" | Repeats the output pdf for the given number of times. This option is only available when the output is PDF. Optional. |
| "output_page_margin" | Margin in px, can also add top, bottom, left, right. This option is only available when the output is PDF and the template type md or HTML. Optional. |
| "output_page_orientation" | Sets the orientation to portrait (default) or landscape. This option is only available when the output is PDF and the template type md or HTML. Optional. |
| "output_page_width" | Width in px, mm, cm, in. No unit means px. This option is only available when the output is PDF and the template type md or HTML. Optional. |
| "output_page_height" | Height in px, mm, cm, in. No unit means px. This option is only available when the output is PDF and the template type md or HTML. Optional. |
| "output_page_format" | Sets the page format to A4 (default) or letter. This option is only available when the output is PDF and the template type md or HTML. Optional. |
| "output_merge" | Instead of returning back a zip file for multiple output, merge it. This option is only available when the output is PDF. Optional. |
| "output_split" | You can choose to split a PDF in separate files. You will get one file per page in a zip file. This option is only available when the output is PDF. Optional. |
| "identify_form_fields" | Boolean value. Identify the form fields by filling the name of each field into the respective field. Optional. |
| "output_sign_certificate" | Requires PDF output. Signing certificate for the output PDF (pkcs #12 .p12/.pfx) as a base64 string, URL, FTP location or a server path. Optional. |
| "output_sign_certificate_password" | Requires PDF output. If you are signing with a password protected certificate, you can specify the password as a plain string. Optional. |
| "output_text_delimiter" | Requires output csv and template type excel, this option will specify the text delimiter. Can be " or ' (default "). Optional. |
| "output_field_separator" | Requires output csv and template type excel, this option will specify the field separator. Default ,. Can be any ascii character or 'tab' for tab and 'space' for space. Optional |
| "output_character_set" | Require output csv and template type excel, will determine the character set. Should be an integer. See: https://wiki.openoffice.org/wiki/Documentation/DevGuide/Spreadsheets/Filter_Options#Filter_Options_for_Lotus.2C_dBase_and_DIF_Filters for possible values. Default 0 or system encoding. Optional. |
Below an example of an output with a watermark. Please note that the output should be PDF:

Cloud Based Authentication
The current version of Cloud Office Print supports up to six cloud based services. The ones currently supported are:
- Dropbox
- Google Drive
- Amazon S3
- OneDrive
- FTP
- SFTP
Each cloud based service expects a specific "cloud_access_token" parameter in order to securely store your files in the desired location.
The following table shows what each cloud service needs from the parameter "cloud_access_token" in order to use its service:
| Cloud Service | Access Token Format | Explanation |
|---|---|---|
| Dropbox | OAuth 2 token string | Dropbox requires an OAuth 2 access token. This can be retrieved when authenticating through the OAuth process. More information can be found here. |
| Google Drive | OAuth 2 token string | Google Drive requires an OAuth 2 access token. This can be retrieved when authenticating through the OAuth process. More information can be found here. |
| OneDrive | OAuth 2 token string | OneDrive requires an OAuth 2 access token. This can be retrieved when authenticating through the OAuth process. More information can be found here. |
| Amazon S3 | JSON object | Amazon S3 authentication requires two keys in order to save a file on its cloud: "AWS access key ID" and "AWS secret access key". More information about this can be found here. |
"cloud_access_token" : {
    "access_key": "AWS access key ID",
    "secret_access_key": "AWS secret access key"
}
| Cloud Service | Access Token Format | Explanation |
|---|---|---|
| FTP | JSON object | The FTP protocol requires the following parameters. If no 'port', 'username' or 'password' attributes are present, they will be assigned default values. The default 'port' is 21. The default 'user' is anonymous and the default 'password' is anonymous@. |
"cloud_access_token" : {
    "host": "FTP-Server-IP || hostname",
    "port": 21,
    "user": "username",
    "password": "password"
}
| Cloud Service | Access Token Format | Explanation |
|---|---|---|
| SFTP | JSON object | The SFTP protocol requires the following parameters. If no 'port' attribute is present, it will be assigned 22. |
"cloud_access_token": {
    "host": "SFTP-Server-IP || hostname",
    "port": 22,
    "user": "username",
    "password": "password"
}
"api_key"
The value of this key is the API key given by Cloud Office Print. Only applicable for service users.
"files" array
This array contains the data that will be used for the given template. If this array contains more than one object then the output files, which are generated using the same template for each output, will be returned in a zip file. This array contains JSON objects with following fields:
| JSON | Explanation |
|---|---|
| "filename" | This field contains the name of the output file. |
| "data" | This array (containing one object) or object contains the data that will be inserted in the template. This will contain text information that needs to be inserted into the output pdf. See cop_pdf_texts for more info. |
It is possible to specify a REST endpoint as your source. The structure is the following:
{
    "filename": "test",
    "datasource": "graphql",
    "query": "query { shows { name   year   genres   episodes { name   poster   description } } }",
    "endpoint": "https://api.graph.cool/simple/v1/cjwj18ejn5n4x01593uoft50b",
    "headers": [{ "Custom-Auth-Token": "xysazxklj4568asdf46a5sd4f" }],
    "auth": "" //Basic authentication i.e. 'user:password' to compute an Authorization header.
},
{
    "filename": "file2.docx",
    "datasource": "rest",
    "method": "GET",
    "body": "...",
    "endpoint": "https://www.example.com/qr/",
    "headers": [
        { "Content-Type": "application/json" },
        { "Custom-Auth-Token": "xysazxklj4568asdf46a5sd4f" }
    ],
    "auth": "" //Basic authentication i.e. 'user:password' to compute an Authorization header.
}
If GraphQL is provided as source, this will be converted to a REST request with POST method and the header Content-Type will be automatically set to application/json.
Please note that these endpoints should return a JSON.
Example showing a basic JSON file which should be populated with data:
{
    "template": {
        "filename": "template.docx",
        "template_type": "docx"
    },
    "output": {
        "output_encoding": "raw",
        "output_type": "docx",
        "output_directory": "."
    },
    "files": [
        {
            "filename": "file1",
            "data": [{...}]
        }
    ]
}
cop_pdf_texts
It is possible to add texts in PDF documents. The data object inside the files array should contain an object with key cop_pdf_texts. This object contains an array for each page number where the text should be shown. The structure is the following:
"data": [
    {
        "COP_PDF_TEXTS": {
            "1": [
                {
                    "text": "First text to be shown in first page",
                    "x": 50, //The x coordinate starting from bottom left.
                    "y": 50, //The y coordinate starting from the bottom left.
                    "rotation": "60", //rotation in degree.
                    "bold": false,
                    "italic": false,
                    "font": "Arial",
                    "font_color": "#FF00FF" //Color either in name (as in red, blue) or rgb. css notation
                },
                {
                    "text": "Second text to be shown in first page",
                    "x": 150,
                    "y": 50,
                    "rotation": "60",
                    "bold": false,
                    "italic": false,
                    "font": "Times new roman",
                    "font_color": "#00FFFF"
                }
            ],
            "2": [
                {
                    "text": "",
                    "x": 50,
                    "y": 50,
                    "rotation": "60",
                    "bold": false,
                    "italic": false,
                    "font": "Arial",
                    "font_color": "#FF00FF"
                }
            ],
            "all": [
                {
                    "text": "Page {currentpage}/{totalpage}",
                    "x": 0,
                    "y": 0,
                    "font": "Arial",
                    "font_color": "#000000",
                    "font_size": "21"
                }
            ]
        }
    }
]
It is possible to specify text for all pages. You should provide this with the all key. The text can now contain {currentpage} and {totalpage} tags which will be replaced accordingly.
You can also provide "P1", "P2" and so on for page numbers instead of "1", "2", "3".
cop_pdf_images
It is possible to add images in PDF documents. The data object inside the files array should contain an object with key cop_pdf_images and the necessary information, similar to cop_pdf_texts. This object contains an array for each page number where the image should be shown. The structure is the following:
"data": [
    {
        "COP_PDF_IMAGES": [
            {
                "1": [
                    {
                        "image": "..", //Can be base64 or URL
                        "x": 250,
                        "y": 250,
                        "rotation": 30,
                        "image_width": 30,
                        "image_height": 50
                    }
                ],
                "all": [
                    {
                        "image": "..",
                        "x": 5,
                        "y": 5,
                        "rotation": 0,
                        "image_max_width": 30 //=> for scaling purposes
                    }
                ]
            }
        ]
    }
]
You can also provide "P1", "P2" and so on for page numbers instead of "1", "2", "3".
Cloud Office Print Form Filling
It is possible to fill in forms using Cloud Office Print. The data object inside the files array should contain an object with the key cop_pdf_form_data. The available forms can be queried by providing the "form_fields" type in the output_type. This will provide the forms that were found. Please note that Cloud Office Print does not handle XFA forms.
Types of form:
- InputField : Just provide the value that you want to fill in.
- Radio/Checkbox: Either true or false.
If it is unclear which form field names correspond to which actual field, the output option identify_form_fields can be used to fill in each form field with the name of that field.
Cloud Office Print PDF Signing
It is possible to sign the output PDF if the output pdf has a signature field. The certificate (pkcs #12 .p12/.pfx) should be passed in the "output" JSON object with output_sign_certificate in a base64 encoded format (this can also be a URL, FTP location or a location in the file system).
It is now possible to sign pdf with password protected certificates too, if you are signing with password protect certificates specify password as output_sign_certificate_password as a plain string along with output_sign_certificate.
"logging" object
When Cloud Office Print is started with --enable_printlog, it will create a file on the server called server_printjob.log. You can add additional logging information next to the one Cloud Office Print is logging by default, by adding additional keys and values in the logging object.
For example:
"logging": {
    "template_filename": "Cloud Office Print template",
    "output_filename": "output.docx"
}
"ipp" object
Cloud Office Print supports to print directly to an IP Printer by using this setting. If your IPP printer supports PDF files, your documents will be converted to PDF and sent to the IPP printer. If your printer does not support PDF and supports PostScript then the pdf generated is converted to pdf using pdftops. You need to download xpdf tools from: xpdfreader.com/download.html. Make sure that the binary pdftops is on the PATH variable. You can download executables from apexofficeprint.com to check whether or not your IPP printer supports PDF/postscript. The structure of this object is:
"ipp": {
    "location": "http://10.0.14.223:631/",
    "version": "1.1",
    "requester": "YOUR NAME",
    "job_name": "Cloud Office Print"
}
"post_process" object
This option allows the request to run a command after the given request has been processed but before returning back the output file. The structure of this object is:
"post_process": {
    "command": "echo", // The command to execute. This command should be present in the cop_config.json file.
    "return_output": true, // Whether to return the output or not. Note this output is Cloud Office Print's output and not the post process command output.
    "delete_delay": 1500, // Cloud Office Print deletes the file provided to the command directly after executing it. This can be delayed with this option. Integer in milliseconds.
    "command_parameters": {
        "p1": "Parameter1",
        "p2": "Parameter2",
        "p3": "Parameter3"
    } // Parameters for the post process command.
}
See server configuration part for available parameters.
"conversion" object
This option allows the request to run a command before and after the conversion happens to the provided files (also for prepend and append files). This command allows some parameters. This command allows you to modify the input file however the type should remain the same. The structure of this object is:
"conversion": {
    "pre_command": "echo", // Command to run before conversion.
    "pre_command_parameters": {
        "p1": "Parameter1",
        "p2": "Parameter2",
        "p3": "Parameter3"
    }, // The parameters from the pre conversion command.
    "post_command": "echo", // Command to run after conversion.
    "post_command_parameters": {
        "p1": "Parameter1",
        "p2": "Parameter2",
        "p3": "Parameter3"
    }
}
See server configuration part for available parameters. Default parameters are inputFile and inputFormat which will resolve to the location of the inputFile and the inputFormat.
"merge" object
This option allows the request to run a command after the merging has happened to the provided files. This command also allows you to give parameters. This command allows you to modify the input file however the extension should remain the same. The structure is:
"merge": {
    "post_command": "echo", // Command to run after merge.
    "post_command_parameters": {
        "p1": "Parameter 1",
        "p2": "Parameter 2",
        "p3": "Parameter 3"
    } // Parameters if the command requires any.
}
See server configuration part for available parameters. Default parameters are inputFile and inputFormat which will resolve to the location of inputFile and the inputFormat.
Route paths
Cloud Office Print allows you to query some information about the environment using different routes. You can check the version of application, supported template types, prepend and append files.
The routes are mentioned below:
/
This will return a web editor which you can use to quickly change the template/ data of an existing JSON or simply use it to test out Cloud Office Print.
/marco
This will return a "polo" string with a HTTP 200 status code. You can use this to check if the Cloud Office Print server is running and reachable.
/soffice
This will return the current version of Libreoffice installed on the server.
/officetopdf
This will return the current version of OfficeToPdf used. (Only available in Windows environment).
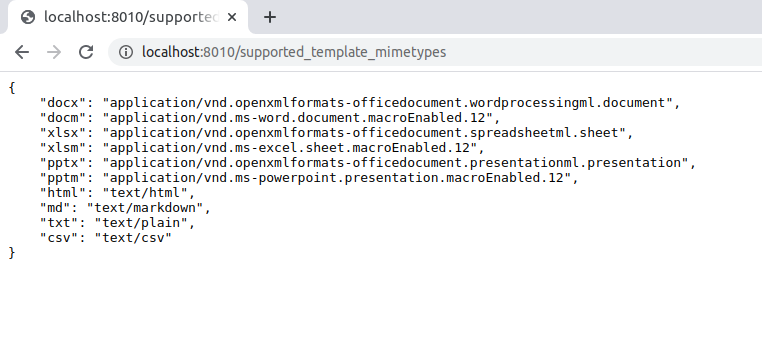
/supported_template_mimetypes
This returns JSON data of the mime types of templates that Cloud Office Print supports as shown below.
/supported_output_mimetypes
This returns the supported conversion for the given template extension. For example: http://localhost:8010/supported_output_mimetypes?template=docx
Specify the extension of the template as ?template=template_file_extension as shown below:
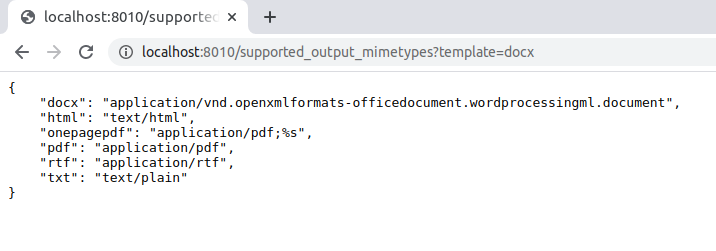
The above image shows that a docx file can be converted to docx, html, onepagepdf, pdf, rtf and txt.
Similarly you can try with:
/supported_output_mimetypes?template=xlsx/supported_output_mimetypes?template=pptx/supported_output_mimetypes?template=pdf
Note: You will get an empty JSON if the conversion type isn't supported.
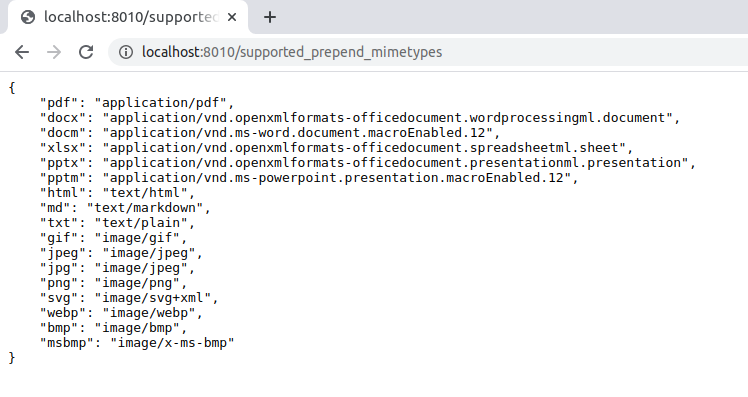
/supported_prepend_mimetypes
This returns the supported prepend file mime types in JSON format.
Note: If an invalid route or url is specified, you will get an error message of 'Cannot GET / your_url'
/verify_template_hash
This returns if hash is valid and present in cache. Like below:
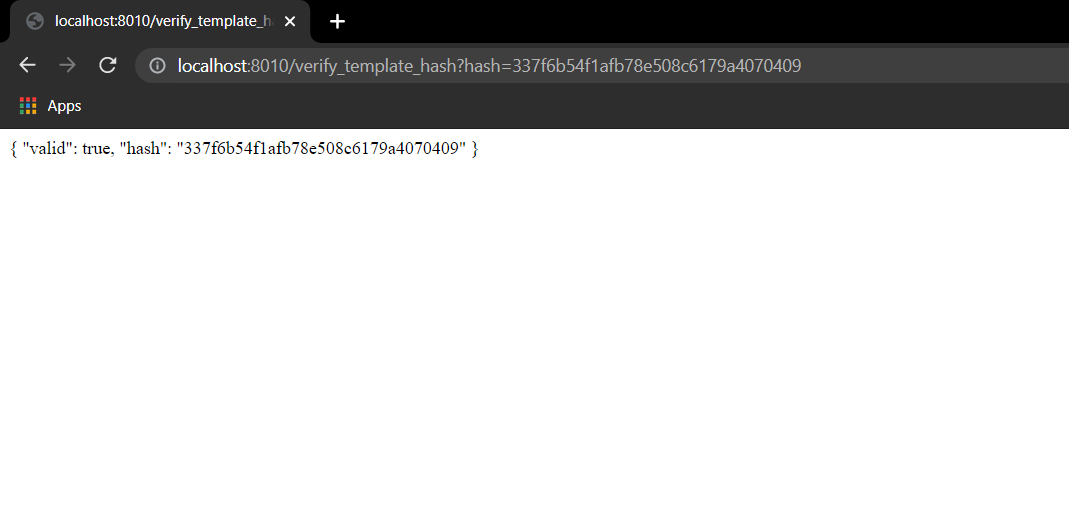
The format of this endpoint is verify_template_hash?hash={hashcode} where hashcode is the hash of the cached template.
For example: verify_template_hash?hash=337f6b54f1afb78e508c6179a4070409
Full URL: http://localhost:8010/verify_template_hash?hash=337f6b54f1afb78e508c6179a4070409
/version
This will return the current version of Cloud Office Print.
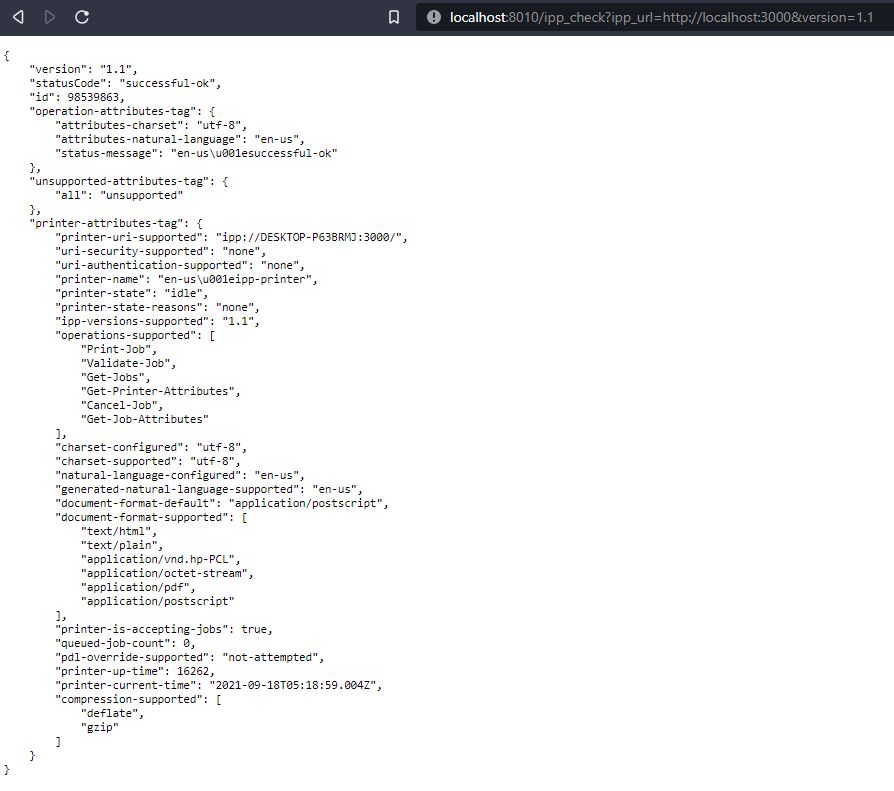
/ipp_check
This returns the status of the ipp printer based on given ipp_url and version. For example: http://localhost:8010/ipp_check?ipp_url=http://localhost:3000&version=1.1
Specify the ipp url and verseion as ?ipp_url=ipp_printer_url&version=version as shown below.